ist346-content
Lab M - Internet of Things
The Internet of Things or IoT represents technologies embedded into everyday objects so that they can communicate over the Internet. From WiFi tooth brushes to traffic cameras, it seems like nothing is immune from the IoT craze.
Anything connected to a network can be considered an IoT device, your cell phone, a sensor, another computer, camera, etc. In this lab we will simulate a “smart drinking glass” which every time the drinking glass is set down on a flat surface will communicate over the Internet how much liquid remains. It sends this data to the Internet in the form of a percentage; from there we will us common IoT tools to build a data pipeline based on the data web we receive.
Normally there are 1,000’s of sensors, so how do we keep track of the messages? This is handled by the MQTT protocol, which is a machine to machine protocol for the Internet of Things. The MQTT Broker collects messages from the sensors and queues them until the Node Red platform is ready to consume and process them. This extra layer is important with IoT networks as the MQTT broker prevents loss of data over the network between sensors and platforms which process the data. Without MQTT we would not be able to make changes to the IoT platform without losing data!
+--------+            +-------------+           +-------------+           +
| IoT    |--Messages--| Mosquitto   |-Messages--| Node Red    |
| Sensor |            | MQTT Broker |           | IoT Platform|
+--------+            +-------------+           +-------------+
Learning Objectives
In this lab you will
- Gain a conceptual understanding of how the IoT works.
- Learn how to create a simple data workflow from IoT data using the NodeRed tool https://nodered.org/ - a flow based programming tool for the Internet of Things.
Before you begin
Prep your lab environment.
- Open the PowerShell Prompt
- Change the working directory folder to
ist346-labs
PS > cd ist346-labs - Update your git repository to the latest version:
PS ist346-labs> git pull origin master - Change the working directory to the
lab-Mfolder:
PS ist346-labs> cd lab-M
Start the environment
- Before we get started you will need edit the
docker-compose.ymlfile in the Lab-M folder and add your email address and smtp settings where indicated under the sendmail section.
PS ist346-labs\lab-M> notepad docker-compose.yml - Fin the line that says:
SMTP_TO_EMAIL: YOUR_EMAIL_GOES_HERE
and replace it with your@syr.eduemail address. For example:
SMTP_TO_EMAIL: mafudge@syr.edu - Save the file and return to the command line.
- Start the environment using docker-compose:
PS ist346-labs\lab-M> docker-compose up -d --build
We need to add--buildbecause we changed the docker-compose file.
This take a while, the sensor image is large. - Check the status of the containers. Type:
PS ist346-labs\lab-M> docker-compose ps
You should see 4 containers, all in theUpstate. - Once everything starts you should be able to navigate to your fake sensor at this website: http://localhost:9393/
- Feel free to try the sensor out a few times, clicking the Drink! and Refill buttons. You will see the sensor output at the bottom of the page. This in
IoT Data Processing Logic
It would be nice to know when the glass is empty. In this part of the lab we will use Node Red https://nodered.org/, a data flow based programming tool for the Internet of Things, to send us an email when the glass is empty. Yes it’s a simple and rather silly example, but it does demonstrate how an IoT architecture works.
Little to no actual processing occurs in an Iot sensor. All our beer glass sensor does record the percentage full of the glass is and send it to the MQTT broker. The decision making on whether or not to send an email will occur in the NodeRed platform.
- To access Node Red, open another tab in your browser and navigate to http://localhost:1880/ in your browser, you should see a screen like the one below:

- Our device is using the MQTT protocol, to access our device we need to add a mqtt input. You can do that by dragging and dropping the input from the left to the blank area on the screen.
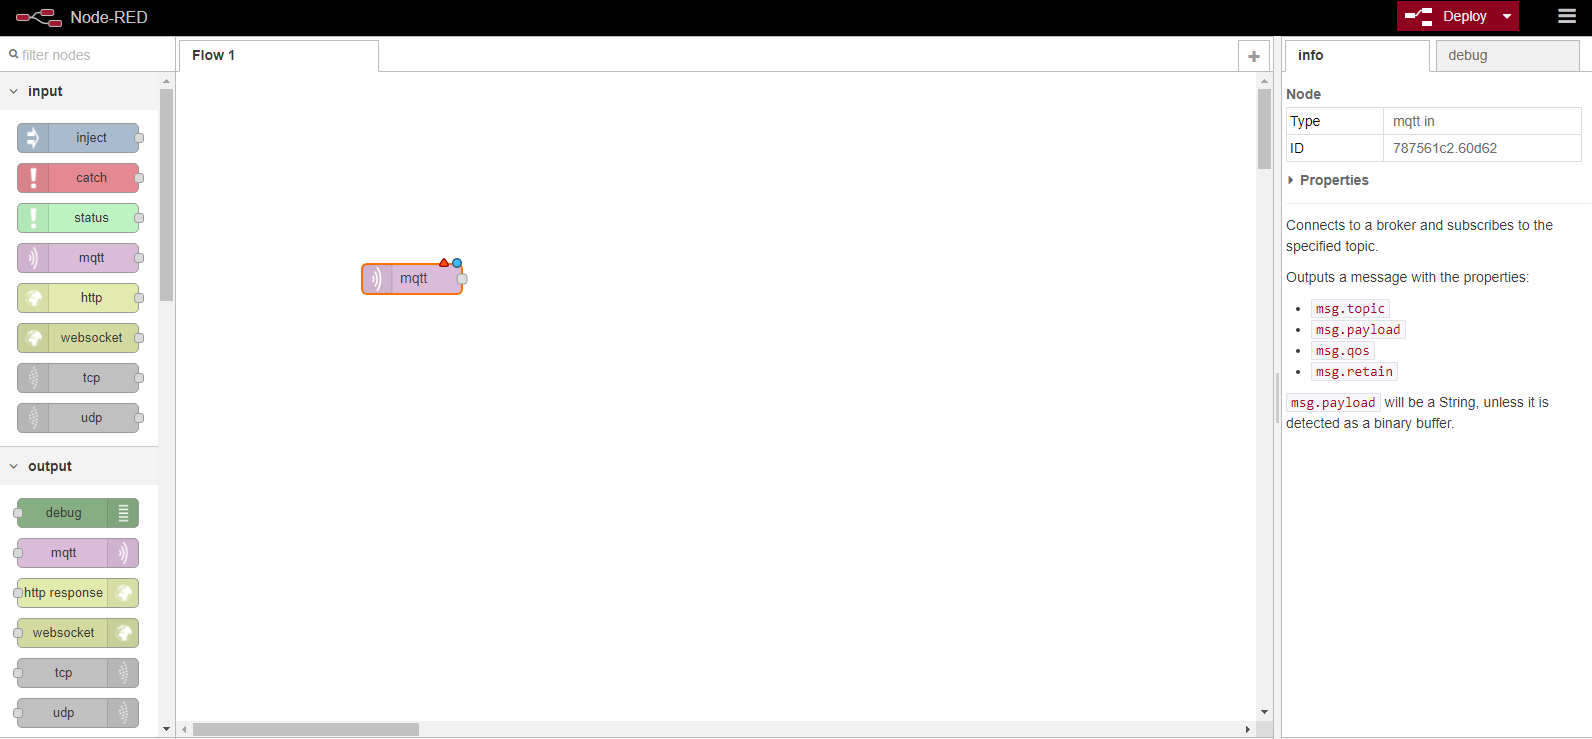
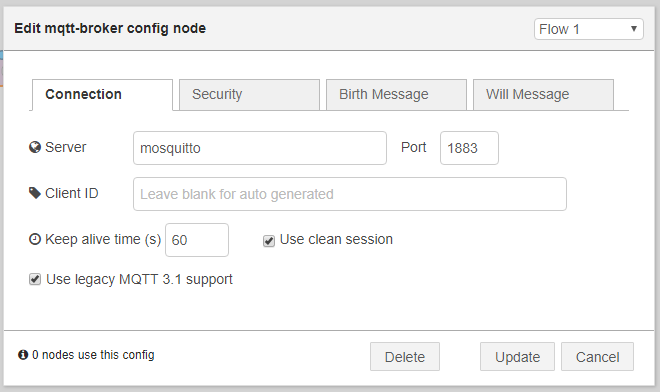
- Right now the input is not connected to the device(s). In fact it never actually connects to the devices, but instead listens for messages to arrive on our MQTT broker. To configure that double click on the MQTT input you dropped onto the screen. When the modal dialog opens you will need to add a broker by clicking the pencil on the right of the server input box.
- Enter the the broker name
mosquittoas shown below and click Add or Update
- An MQTT topic is the channel for the IoT data. One MQTT broker can handle millions of messages so we use topics to categorize messages similar to each other. Back on the first modal, enter
sensorfor the topic as seen in this screenshot:
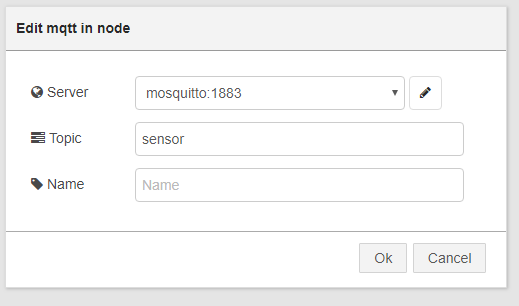
After you enter the topic name click the Ok button. - If everything is correct you should see the red triangle go away, and only see a blue circle on the purple box labeled sensor.
- Let’s see what’s going on. Add a debug output box to the screen, and drag a connector from the sensor (purple) to the msg.payload debug box (green) to form a line between the two boxes:
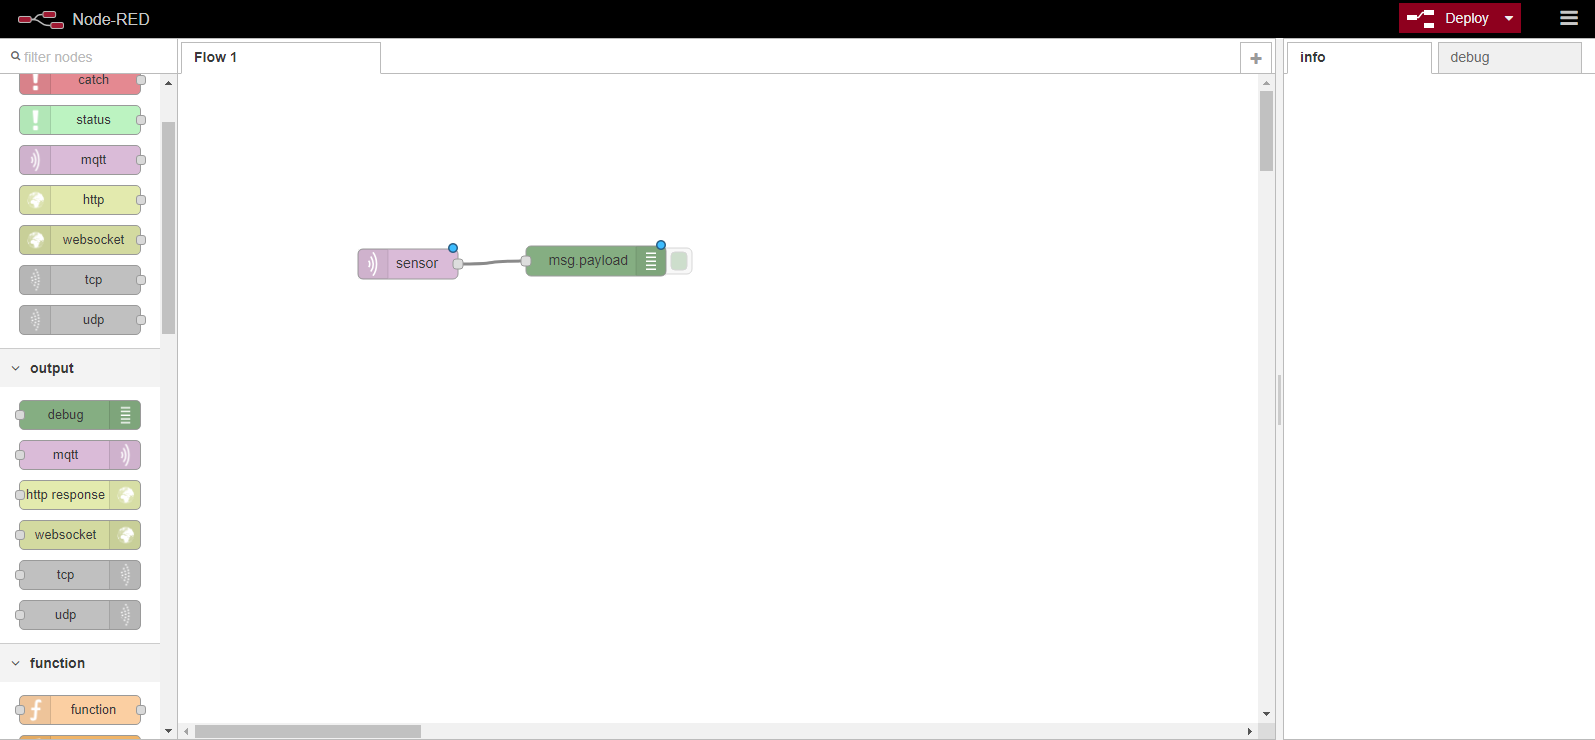
- Then click the red Deploy button in the upper right corner of the screen, this activates our workflow, in effect running the program we just built!
- Click on the debug tab on the right side of the screen, right under the Deploy button then go back to your beer glass IoT device at http://localhost:9393/, and go ahead and try the sensor again, clicking Drink! or Refill several times. You should be able to now see the output in the debug window. If everything is correct you should see something similar to the screenshot below.
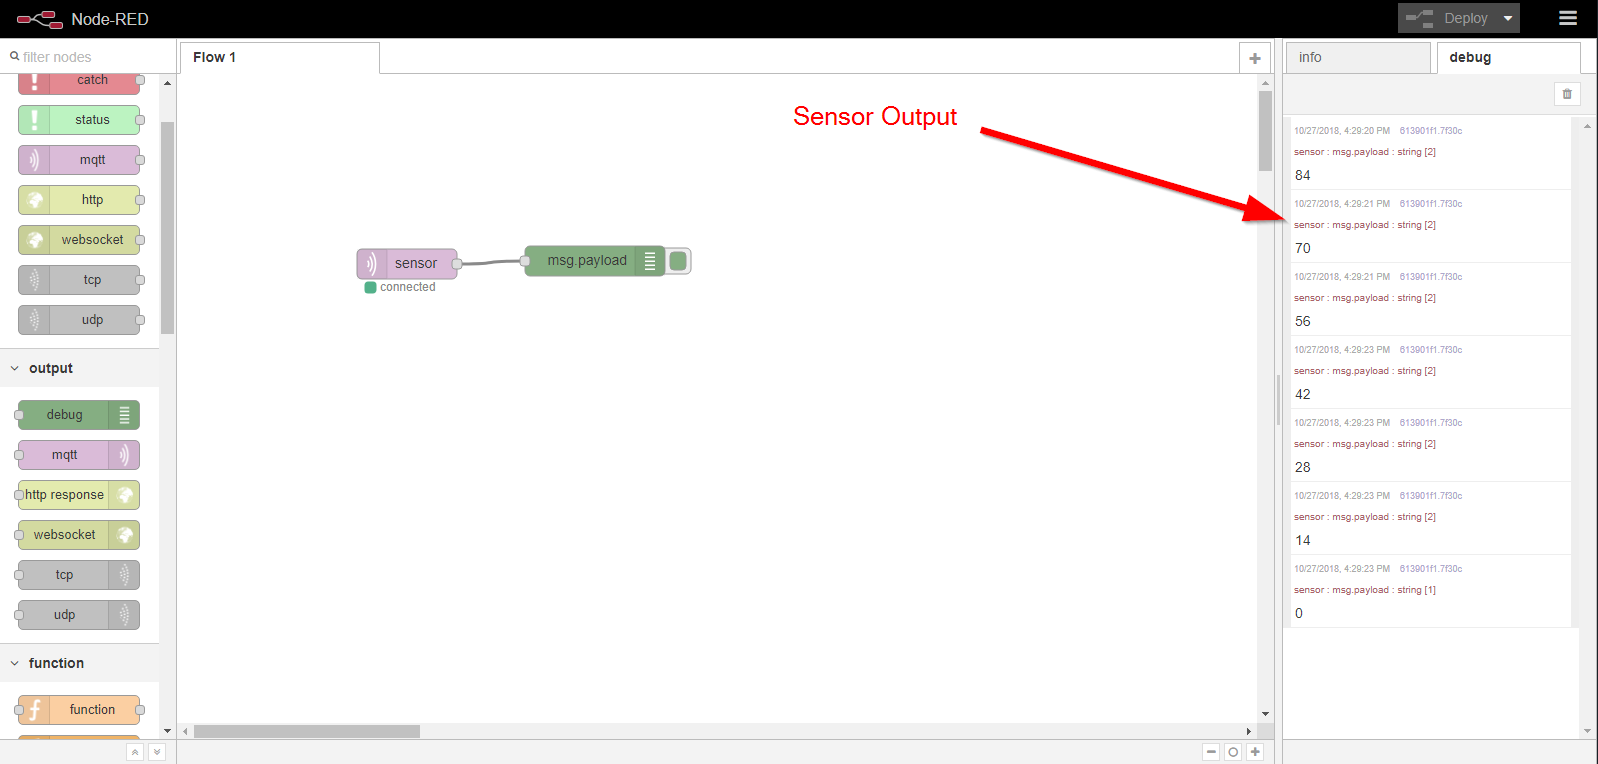
WHAT IS HAPPENING HERE?!?! As the sensor generates data it publishes the messages to the MQTT Broker on the topic sensor. The Node Red application is subscribed to listen for messages on the same topic. When it sees a message it processes the message by displaying it to the debut window. - We aren’t doing anything significant yet. We are really only interested when one of the containers are empty, this way we send a notification to refill the container and keep our customers happy!
To do that we need to add a switch, that only activates our debug message when a container is empty. To do that add a switch and connectors like the screenshot below.
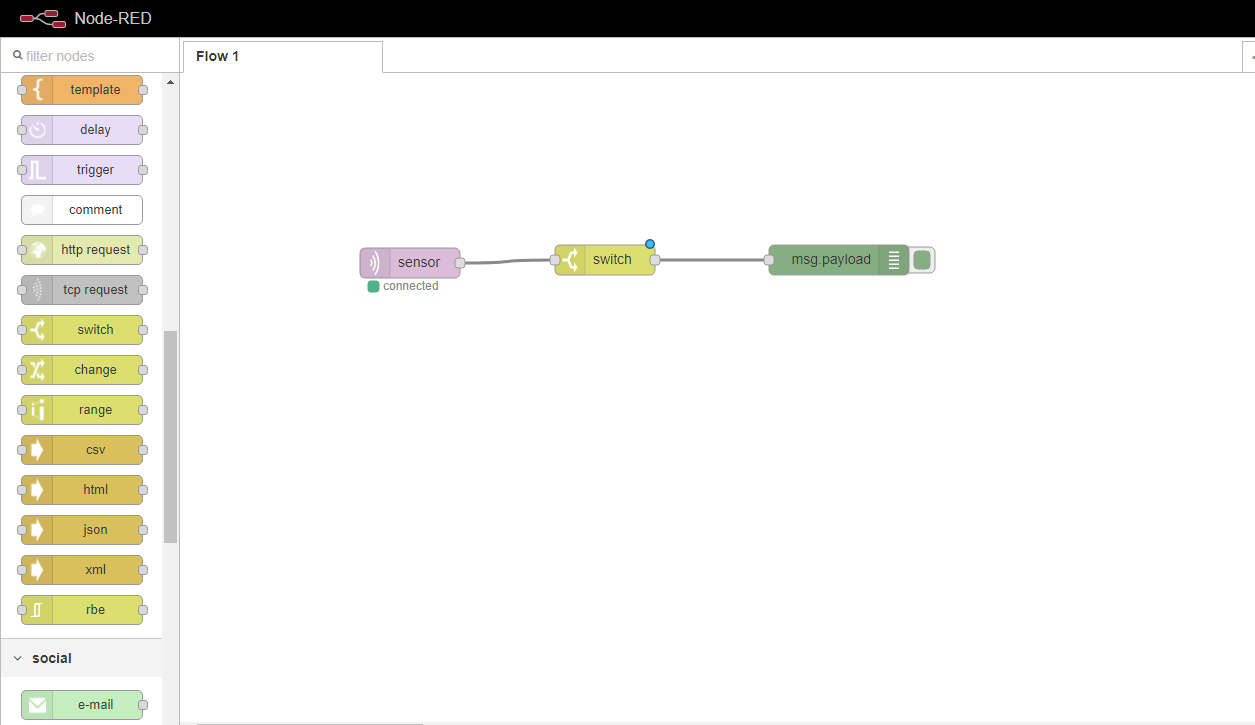
First click on the list between sensor and msg.payload and delete it.
Then add the Switch function by dragging it onto the canvas.
finally connect the Switch between the Sensor and the msg.payload - When you have the flow setup, let’s configure the switch. Double click on the switch and edit the configuration.
Name the switchEmpty
Set the Property tomsg.payload
Set the value to0
like the one shown below:
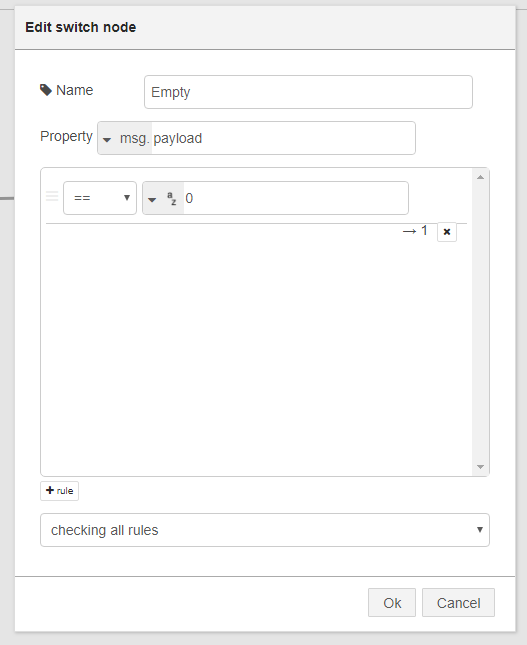 Click *Ok when you have it configured.
 - Now click the red deploy button in the upper right of the screen and lets test the sensor again. This time you should only see a message in the debug area when the sensor reaches 0. If you see all the output still, double check your settings.
- Once everything is working, wouldn’t this be a lot better if someone was alerted when a container was empty so they could refill it?
In the lab we created a mail sending service that exposes an endpoint which accepts requests to send an email.
To get NodeRed to send alert to that endpoint when the container is empty we need to add another function node called http request and the proper connectors, your screen should now look like the screenshot below.
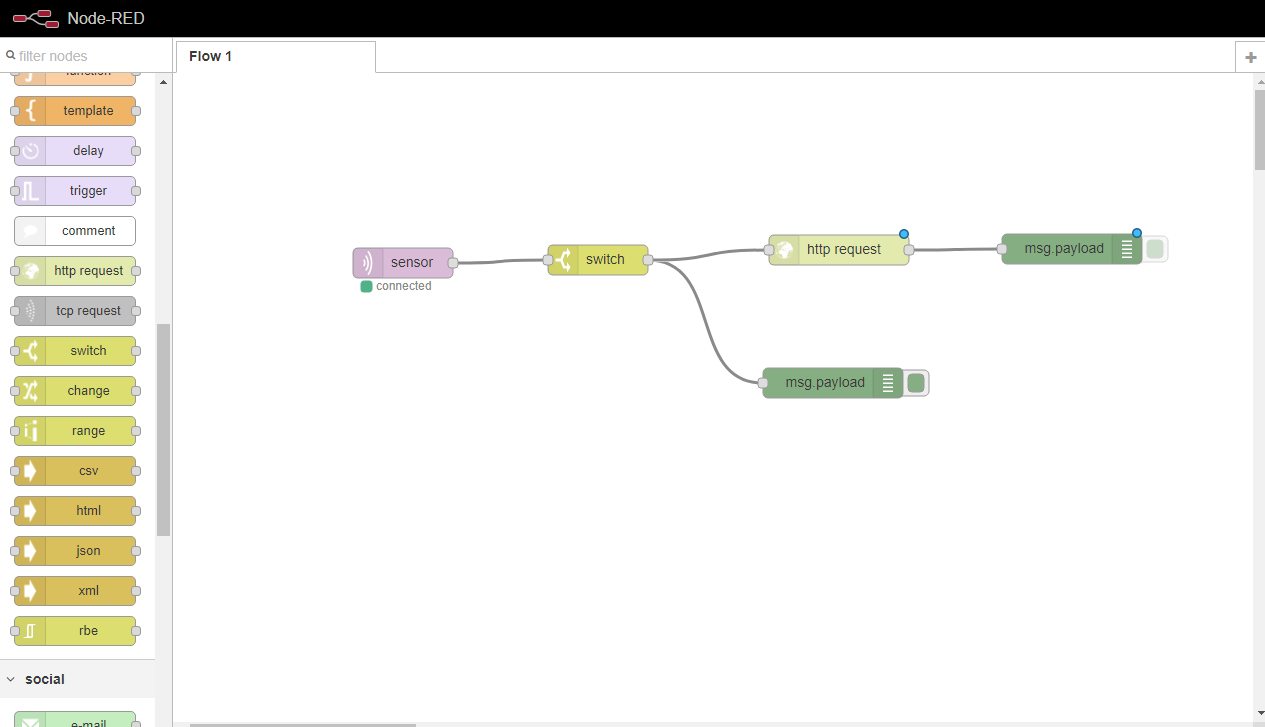
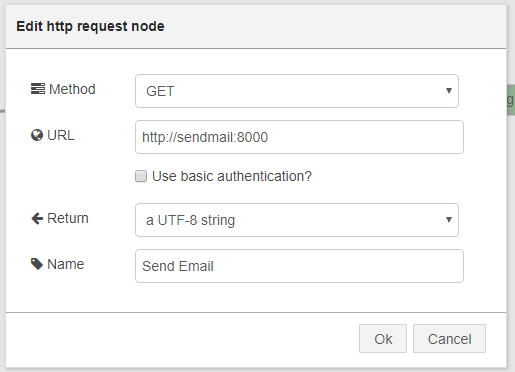
You should attach the http request function to the empty function, then attach another Debug output to the http request function. - Double click on the http request node to open the configuration screen, edit the configuration:
Method:GET
URL:http://sendmail:8000
Use Basic Authentication: Unchecked
Name:Send Email
Screenshot:
- Click deploy to publish our new workflow. Go back to the sensor and test it again, if everything is working you should get an email that the container is empty!
When you empty the IoT glass, you should receive an email to refill your beer! It might take a minute or two for the email to send so be patient!
Tear Down
Be sure to tear down this lab when you are finished:
PS ist346-labs\lab-M> docker-compose down
Questions
- What is the purpose of an MQTT Broker like Mosquitto?
- What is the purpose of a software application like Node Red?
- Where does the majority of the processing occur in an IoT network?
- Does NodeRed actually connect to the IoT device? Explain your answer.
- What is a topic?
- If you want use a single MQTT broker for 4 different IoT applications, what can you do to make sure the different messages are separated on the broker?
- Provide an example of something you use everyday which would be considered IoT?