ist346-content
Lab H - Storage and Network File Systems
Learning Objectives
In this lab you will learn about networked storage and file systems by exploring them in three parts:
- PART 1: You will learn about the basics of networked storage using Samba.
- PART 2: You will understand how network storage is actually deployed in an organization using with centralized authentication.
- PART 3: You will learn how cloud object based storage works, using Mineo, a Amazon S3 (Simple Storage Service) compatible file system.
Before you begin
Prep your lab environment.
- Open the PowerShell Prompt
- Change the working directory folder to
ist346-labs
PS > cd ist346-labs - IMPORTANT: This lab requires access to Docker’s internals, you must enter this command:
PS ist346-labs> $Env:COMPOSE_CONVERT_WINDOWS_PATHS=1 - Update your git repository to the latest version:
PS ist346-labs> git pull origin master - Change the working directory to the
lab-Hfolder:
PS ist346-labs> cd lab-H
Part 1: SMB and PAM
In this first part we setup a simple SMB (Server Message Block) server using Samba. Samba allows us to share files on one system and make them accessible to another over a network. We will control access to the files though Samba users and Linux PAM (Pluggable authenitcation modules).
Goals
- Setup a Simple Samba Server
- Demonstrate how to start and stop services on Linux (Ubuntu)
- Demonstrate how to create a user and file share on the server.
- Start a Linux client, and mount the new share to the clients filesystem, demonstrate how the file is really created on the server from the client.
Step 1: Setup the server
The server has the proper dependencies and packages pre installed.
Lets start by brining up our docker environment. Open you terminal and navigate to the folder that contains the docker-compose file for part 1. And the docker-compose up
Change the working directory to the part1 folder:
PS ist346-labs\lab-H> cd part1
Start the lab environment in Docker:
PS ist346-labs\lab-H\part1> docker-compose up -d
You should see something similar to the following screen.
Creating network "part1_default" with the default driver
Creating part1_server_1 ... done
Creating part1_client_1 ... done
So now the server and client are running waiting to be setup!
First docker exec into the server
PS ist346-labs\lab-H\part1> docker-compose exec server bash
Once at the server container root prompt, lets setup the server. First we need to add a new user that will allow us to connect to our share.
root@sever:/# useradd testuser -m --shell /bin/false
This will add a new user with the username testuser, the --shell flag of /bin/false does not allow the user to login to the server. The -m option creates the home directory.
Next we need to create a Samba password for this user. I suggest something easy to remember, like SU2orange! or testing.
root@server:/# smbpasswd -a testuser
Now that we have a user with a password, we need to configure Samba to share the directory with clients to do this we need to edit the smb.conf file that is installed with Samba. We do this with the nano editor using the command below.
root@server:/# nano /etc/samba/smb.conf
The file contains an enormous amount of configuration options. We are going to go right to the bottom of the file and add the code below:
[myshare]
path = /home/testuser
valid users = testuser
available = yes
browsable = yes
public = yes
writable = yes
read only = no
What’s this? this tell samba to expose the path /home/testuser and call it myshare. The only user that can access this share is testuser. The other options allow for browsability and access. When you are finished with your edits, press CTRL+X to quit nano, pressing y then ENTER to save the file.
Once you add the above code to the smb.conf file you should test it for errors.
root@server:/# testparm
When you run this it will ask you to hit ENTER to see your service definitions, and you will see an output similiar to the one below
Load smb config files from /etc/samba/smb.conf
WARNING: The "syslog" option is deprecated
Processing section "[printers]"
Processing section "[print$]"
Processing section "[myshare]"
Loaded services file OK.
Server role: ROLE_STANDALONE

Press enter to see a dump of your service definitions

# Global parameters
[global]
        server string = %h server (Samba, Ubuntu)
        server role = standalone server
        map to guest = Bad User
        obey pam restrictions = Yes
        pam password change = Yes
        passwd program = /usr/bin/passwd %u
        passwd chat = *Enter\snew\s*\spassword:* %n\n *Retype\snew\s*\spassword:* %n\n *password\supdated\ssuccessfully* .
        unix password sync = Yes
        syslog = 0
        log file = /var/log/samba/log.%m
        max log size = 1000
        dns proxy = No
        usershare allow guests = Yes
        panic action = /usr/share/samba/panic-action %d
        idmap config * : backend = tdb


[printers]
        comment = All Printers
        path = /var/spool/samba
        create mask = 0700
        printable = Yes
        browseable = No


[print$]
        comment = Printer Drivers
        path = /var/lib/samba/printers


[myshare]
        path = /home/testuser
        valid users = testuser
        read only = No
        guest ok = Yes
If there is an error it will tell you, the output below is shortened so you can see the error, where I named the path pathjk
Load smb config files from /etc/samba/smb.conf
WARNING: The "syslog" option is deprecated
Processing section "[printers]"
Processing section "[print$]"
Processing section "[myshare]"
Unknown parameter encountered: "pathjk"
Ignoring unknown parameter "pathjk"
WARNING: No path in service myshare - making it unavailable!
NOTE: Service myshare is flagged unavailable.
Loaded services file OK.
Server role: ROLE_STANDALONE

Press enter to see a dump of your service definitions
...
Can you see what the error is?
After the server setup is complete and there are no errors we can start the service.
First check the status. So see the status of a service, you can use the following command
`root@server:/# service smbd status
which will output:
* smbd is not running
Currently our service is not running, lets fix that. user the service command to start samba, you will see the output below.
root@server:/# service smbd start
The output:
* Starting SMB/CIFS daemon smbd [ OK ]
root@server:/# service nmbd start
The output:
* Starting NetBIOS name server nmbd [ OK ]
To stop a service use the following command, if you stop it don’t forget to start it again before moving onto the client setup!
root@server:/# service smbd stop
* Stopping NetBIOS name server nmbd [ OK ]
One more
root@server:/# service smbd status
To make sure its running, and if it is, its time to exit the server container:
root@server:/# exit
Access the share from a client
Back at the PowerShell prompt, let’s access the client:
PS ist346-labs\lab-H\part1> docker-compose exec client bash
Once logged in you can view the shares provided by the server using the command below.
root@client:/# smbclient -L //server -U testuser
You will have to enter the password for testuser in order to authenticate to the Samba service and see the shares.
WARNING: The "syslog" option is deprecated
Enter testuser's password:
Domain=[WORKGROUP] OS=[Windows 6.1] Server=[Samba 4.3.11-Ubuntu]

        Sharename       Type      Comment
        ---------       ----      -------
        print$          Disk      Printer Drivers
        myshare         Disk
        IPC$            IPC       IPC Service (35f96533555e server (Samba, Ubuntu)) Domain=[WORKGROUP] OS=[Windows 6.1] Server=[Samba 4.3.11-Ubuntu]

        Server               Comment
        ---------            -------
        SERVER         server server (Samba, Ubuntu)

        Workgroup            Master
        ---------            -------
        **WORKGROUP**
We can see that the myshare that we created listed in the output
To actually use the share, we need to mount it to the client file system. To do this we use the mount command.
First, we make a folder to serve as the mount point:
root@client:/# mkdir /mnt/myshare
Then we mount the Samba share to the mount point:
root@client:/# mount -t cifs -o user=testuser //server/myshare /mnt/myshare
after entering the password the shared path is now mounted to the local filesystem, and we can interact with it just like it was part of the client.
We can create a file:
root@client:/# echo "This is a test" > /mnt/myshare/test.txt
We can list the files on the server: (NOTE:You should see the test.txt file that was created above)
root@client:/# ls /mnt/myshare
Now lets check the server, exit the client:
root@client:/# exit
And when you are back at the PowerShell prompt, connect to the server container:
PS ist346-labs\lab-H\part1> docker-compose exec server bash
List the items in the folder we shared, we should see the new test.txt file!
$root@server:/# ls /home/testuser
test.txt
And if we view the content of the file:
root@server:/# cat test.txt
This is a test
Our text is there!
Part 1 Teardown
Exit the client to prepare for the next part:
root@server:/# exit
From the PowerShell prompt shutdown part 1
PS ist346-labs\lab-H\part1> docker-compose down
When the client and server are stopped, its time to start part 2, type:
PS ist346-labs\lab-H\part1> cd ..\part2
To change your working directory to the part2 folder.
Part 2: Samba with LDAP
In the next part we will use an LDAP (Lightweight Directory Access Protocol) server to centralize the authentication of users and control the authorization of the SMB mounts. Central authentication is how it is done in organizations so we do not have to be in the business of managing users and passwords on multiple systems! Much of this is already setup for you, and you will just do the configuration of the users and mounts.
https://www.techrepublic.com/article/how-to-populate-an-ldap-server-with-users-and-groups-via-phpldapadmin/
Walkthrough
Let’s start the containers used in part2:
PS ist346-labs\lab-H\part2> docker-compose up -d
This will create 4 containers. The LDAP server, the phpLDAPadmin web interface, the Samba server, and the client we will use to connect to the server.
Creating part2_ldap-host_1 ... done
Creating part2_smbserver_1 ... done
Creating part2_ldap-ui_1   ... done
Creating part2_client_1    ... done
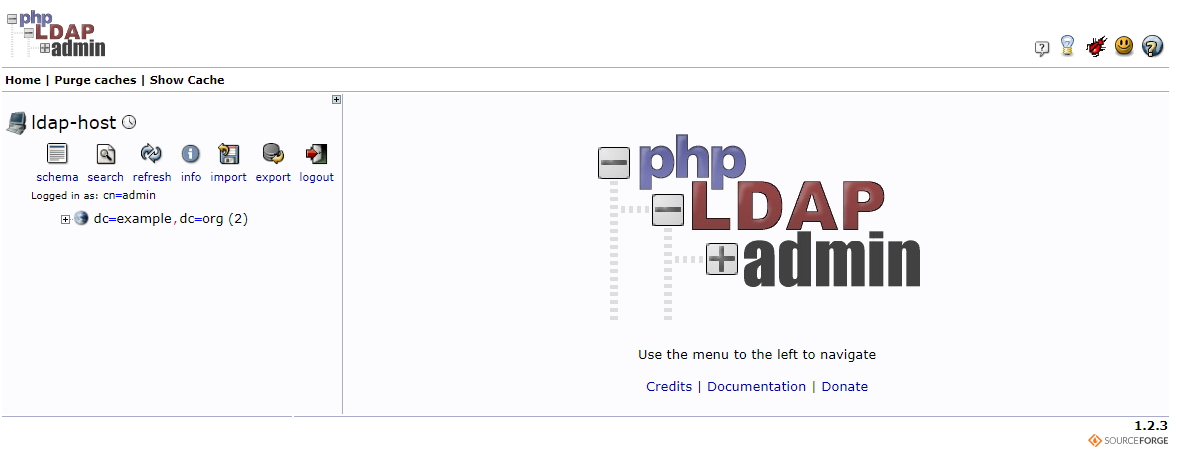
Once all of the containers start, you should be able to navigate to the web interface at http://localhost:9080 in your browser.

To login to the interface click login on the left. You can login with the following credentials
Login DN: cn=admin,dc=example,dc=org
Password: admin
Once Logged in you will see the following screen.
LDAP Setup
Before we can start using samba we need to add a few things to our LDAP directory.
First we need to create a Samba Posix Group.
- Click on the root of the tree.
- Click
Create a child entryin the list of options that appear - Choose
Generic Posix Group - For Group name just enter
samba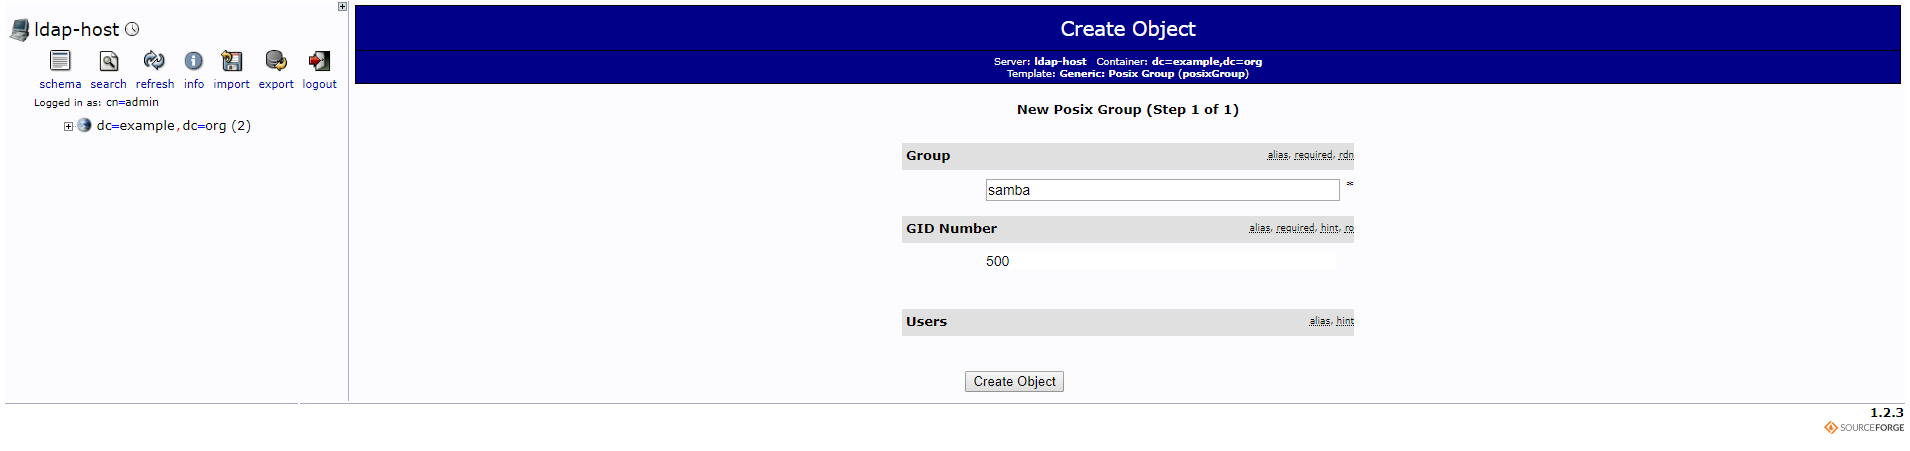
- Click
create objectand then clickcommitat the confirmation screen.
Now we need to create a users Organization Unit
- Click on the root of the tree.
- Click
create child entryunder the root again - Choose
Generic Organizational Unit - Enter
usersfor the name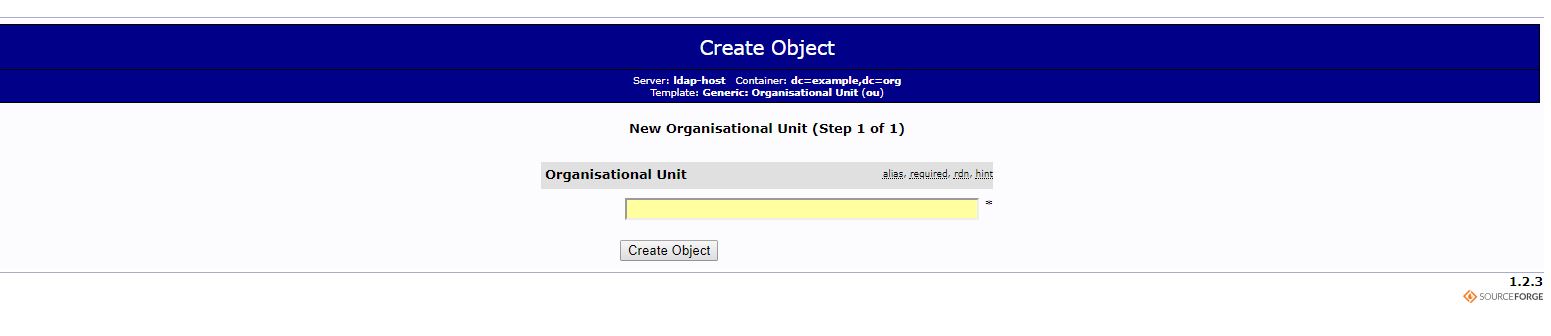
- Click
Create Objectand then clickcommitto confirm.
Next we must create the Samba domain object:
- Click on the root of the tree.
- If you see:
sambaDomainName=EXAMPLEORGthen you can skip this step! - IF YOU DO NOT SEE THE SAMBA DOMAIN. COMPLETE THESE STEPS
Clickcreate child entryunder the root again - Choose
Samba Domain - for the Samba domain name, enter
EXAMPLEORG. Under typical circumstances, this is the name of your organization. In this case our organization isexample.orgto the name works! - For the
sambaSIDuse this:
S-1-5-21-4294955119-3368514841-2087710299
The SID is a unique security identifier for the domain. - Click
Create Objectand then clickcommitto confirm.
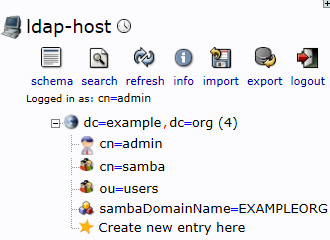
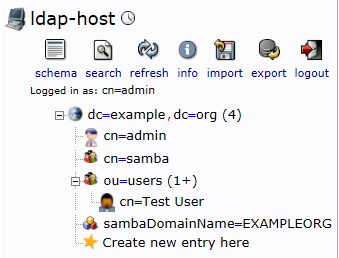
Your Organization Directory should now look like the following:
Add a samba user
Now we need to create a user.
- Click on the ou=users group in your directory tree.
- Then choose
Create child entry. - Choose
Samba Account -
Fill out the following form with the information below, remember the password you enter, I suggest using
testing. Some of the values may be slightly different on your machine.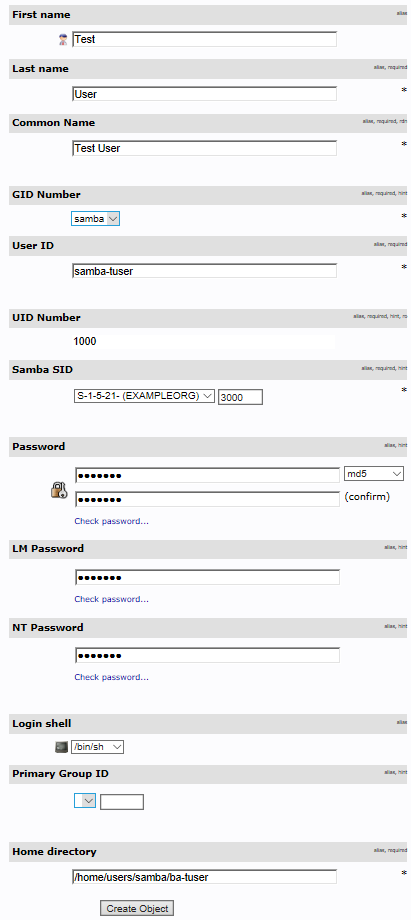
- Click
Create Objectthen clickcommiton the following screen to confirm. - To get our user to work with our setup we need to add a couple of attributes to our user. Your org tree should now look like the following
Click on the cn=Test User in your tree to the left.
- Click on
Add new attributefrom the choices at the top. - Select
sambaPwdMustChangefrom the choices and enter-1for the value. - Click
Update Objectat the bottom, thenUpdate Objectagain. - Click on
Add new attributeagain - Select
sambaPwdLastSetfrom the choices and enter-1again for the value - Click
Update ObjectthenUpdate Objectagain.
Restarting the smbserver… a word about dependencies
When we did a docker-compose up -d we brought up all 4 services, but at that time the smbserver cannot start because LDAP information about the domain EXAMPLEORG had yet to be configured. Now that we have configured it we need to restart the service.
For example Type:
PS ist346-labs\lab-H\part2> docker-compose ps
And notice the part2_smbserver_1 has a state of Exit.
If you inspect the logs:
PS ist346-labs\lab-H\part2> docker-compose logs smbserver
You’ll see information about the smbserver not being able to find the EXAMPLEORG domain in the LDAP server. This is because at the time this service started, we hadn’t created in in the LDAP server yet.
This is an easy problem to fix. Simply restart the smbserver
PS ist346-labs\lab-H\part2> docker-compose restart smbserver
Then check the status of the environment, and if everything went to plan, all 4 services should be Up. Type:
PS ist346-labs\lab-H\part2> docker-compose ps
Now our Samba server bound to our LDAP server is now ready to use!
Using the client
Lets try to connect to the Samba share from the client, but unlike part1 this time we will use the centrally managed account in LDAP.
-
From PowerShell, login to the client container.
PS ist346-labs\lab-H\part2> docker-compose exec client bash - Mount the new drive to your home directory. In real life this would be done for you automatically when you login.
root@client:/# mount -t cifs -o user=samba-tuser //smbserver/samba-tuser /home` -
Let’s change the directory to our newly mounted share:
root@client:/#$ cd /home/samba-tuser -
And Create a new file:
root@client:/#$ echo "This is a test" > test.txt -
Next, we exit the client and check for the file on the server.
root@client:/#$ exitPS ist346-labs\lab-H\part2> docker-compose exec smbserver bash - Let’s look at the file!:
root@smbserver:/#$ cat /mnt/homes/samba-tuser/test.txt
And there are the contents!
This is a test
Tear-down
Let’s get ready for part3, tear down this lab:
root@smbserver:/#$ exit
PS ist346-labs\lab-H\part2> docker-compose down
PS ist346-labs\lab-H\part2> cd ..\part3
You should now be in the part3 folder.
Part 3: Cloud Storage with Minio (Self Hosted S3)
In this part we will utilize cloud storage provided by Minio. Minio is a self hosted S3 (Amazon’s Simple Storage Serivce) compatable object storage. S3 is a very popular storage system used worldwide. This lab demonstrates how S3 protects files utilizing bucket policies. Minio only uses one user, but in S3 you can create a policies for many users. This method of file sharing is suitable in the cloud, where it is not pracital to give out accounts to users.
Goals
- Run a Simple Minio server
- Interact with the server utilizing the minio client.
- Demonstrate simple bucket policies and setting the with the client.
- Interact with Minio through the user interface.
Walkthrough
Begin by starting you Minio environment. Navigate to part3 of the lab and issue the command below.
PS ist346-labs\lab-H\part3> docker-compose up -d
Once the container starts you should be able to navigate to http://localhost:9000 in your browser. If everything is working you should see the following screen.
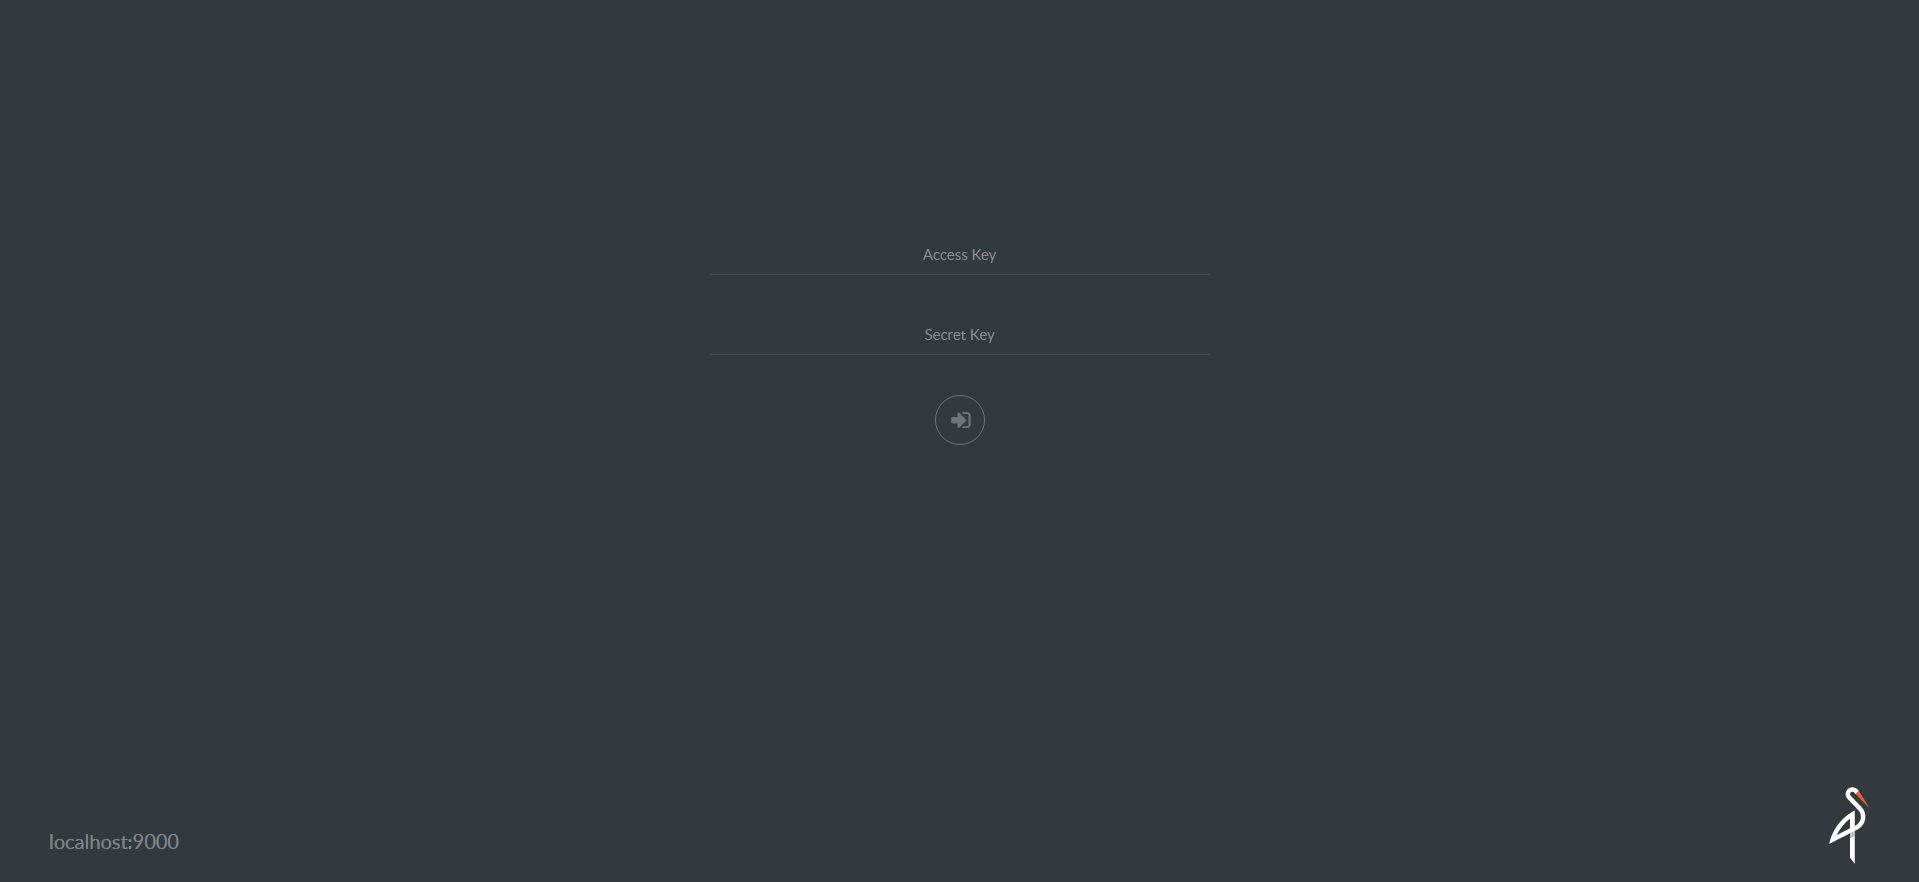
Login to the user interface with the following credentials.
access key: minio
secret key: minio123
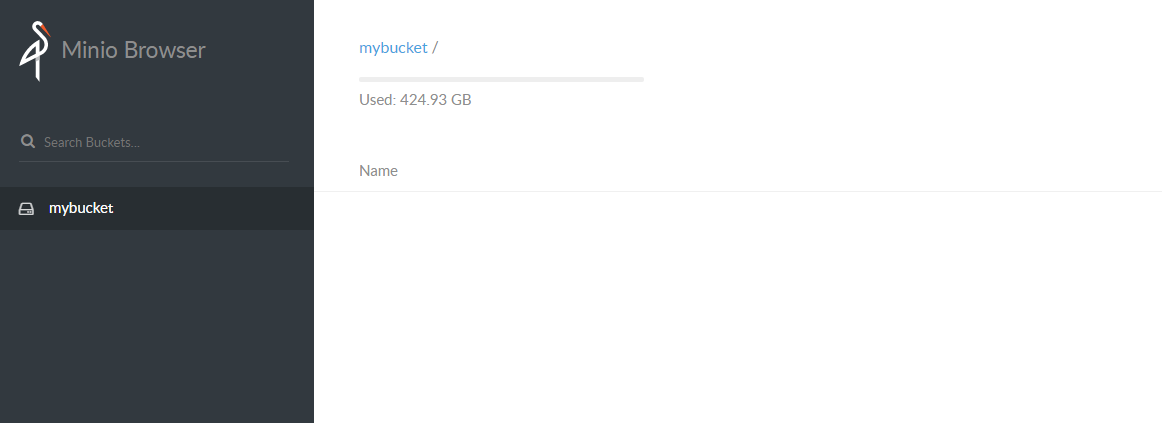
Bucket is basically a root folder to store files in Minio. To create a bucket click the + button in the lower right corner. Choose create bucket. Then enter a name, in our example we use mybucket.
Now that we have a bucket, lets use the client to upload a file. We will be using the minio client to interact with our server. Connect to the client:
PS ist346-labs\lab-H\part3> docker-compose exec client b ash
The prompt should say: [root@cleint /]#
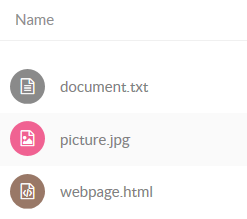
The files we would like to upload from our client can be found in the /files folder:
[root@cleint /]# ls /files
document.txt picture.jpg webpage.html
Let’s configure the minio client to work with our server.
# USAGE:
#  mc config host add ALIAS URL ACCESS-KEY SECRET-KEY
so specifically, we type:
[root@cleint /]# mc config host add myminio http://minioserver:9000 minio minio123
So in this case the alias is myminio. Once the server is added let’s upload our picture.
[root@cleint /]# mc cp /files/* myminio/mybucket
If you refresh your browser you should now see the files we uploaded!
If you click on the picture.jpg file and download it, you should see a picture of a dog!
Bucket policies
Files are secured by bucket policies. The default bucket policy is deny all.
-
To see this Sign out of Minio Browser then go to this URL: http://localhost:9000/mybucket/picture.jpg
-
You will see the login page because you do not have rights to the resource. Let’s create a public bucket policy. Log back in as
minioandminio123. Click on the three vertical dots next tomybucketand selectEdit Policy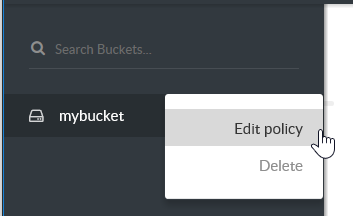
-
Add the prefix
*.jpgfor all JPEG files in the bucket, and selectRead Onlythen clickAddThis will make any files in the bucket read only. Close The Bucket Policy when you are finished.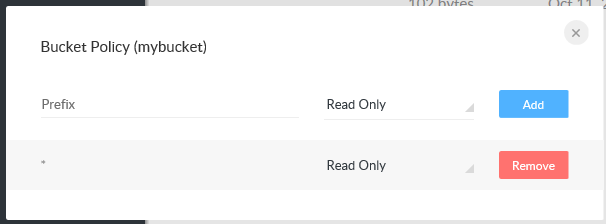
-
Log out of the Minio Browser and once again go to this URL: http://localhost:9000/mybucket/picture.jpg
You are now able to download this file without logging in!
- Now try this URL: http://localhost:9000/mybucket/document.txt
You are unable to download this file because the bucket policy only ensures. *.jpg files can be read!
This is just a very simple example of how a bucket policy works. The real Amazon S3 has more advanced policy, but this is just a quick introduction to how object storage works in the cloud.
Tear-down
- Exit the minio client:
[root@cleint /]# # exit - Bring down the minio server:
PS ist346-labs\lab-H\part3> docker-compose down
Questions
- What is SMB? How does it relate to Samba?
- What is the command to mount the Samba share
//web/hometo the linux folder/mnt/webhome? - If you want to share a folder through Samba, which file must you edit?
- Besides the web interface to LDAP (Hint: there’s one for Samba, too). What are the advantages of Samba + LDAP as opposed to simply using Samba?
- In part 2, why did we have to restart the
smbserverafter we configured the LDAP server? - Why is it impractical for a company to use Samba to share files in the cloud with their customers?
- Explain how an S3 bucket policy works
- If you need to share files with a co-worker, which of the 3 approaches covered in this lab would be used and why?